When I started yaniv.leviathanonline.com, I declared it to be a site about “Mathematics and Hacking”. As of now, most of its content is Mathematical. I thought it was time for a little change…
Those of you with no interest in assembly or low-level programming are welcome to skip this post entirely, although expanding your horizons is never a bad idea!
A few years ago I gave a week-long x86 assembly course for some fellow programmers. As I wanted them to learn how to use the Pentium’s SIMD extensions, I asked them to program a simple fireworks demo and try to apply some filters to it using MMX. In this article I will detail my solution to the SIMD fireworks exercise.
The following paragraph is intended for those of you without assembly knowledge. All of you assembly masters are welcome to skip to the fun stuff below.
Some References
Well, for starters I recommend reading the ”The Art of Assembly Language Programming” (AoA) which covers a lot of the basics. And yes – Assembly Programming is an Art (maybe more so than programming in other languages). Next, you should also read Intel’s manuals: Volume 1: Basic Architecture, Volume 2A: Instruction Set Reference, A-M, Volume 2B: Instruction Set Reference, N-Z, Volume 3A: System Programming Guide, Volume 3B: System Programming Guide and Architectures Optimization Reference Manual. Yes, I know its a lot of reading but they are really interesting and you don’t have to read the whole thing in order (although I recommend it – so many interesting facts lye in those pages). Finally, if you are going to develop in assembly (e.g. assemble the source included in this article) I recommend using NASM, as it is the simplest and cleanest assembler (although some people prefer MASM, which is kind of similar, but a bit more clumsy). If you are going to do some 16-bit DOS programming, you will find Ralf Brown’s Interrupt List (RBIL) a useful tool.
Throughout this article I will assume basic assembly knowledge (the first chapters of AoA will more than cover everything).
The Buzzwords
SIMD stands for Single Instruction Multiple Data. It is clear that most algorithms require repeating the same operation over and over again (each time on different sets of data). From this observation stemmed the idea of a vector computer or SIMD. We will shortly see that indeed our fireworks program will repeat the same operations many times and so we will be using the Pentium’s SIMD capabilities for that purpose.
MMX was Intel’s first attempt at bringing SIMD capabilities to the Pentium. MMX does not stand for anything, but it has been offered several meanings since its appearance (such as Multimedia Extensions). MMX adds 8 new registers (mm0,…,mm7) to the CPU. These are 64-bit registers. The main advantage of these registers (compared to the x86 general purpose registers) is that the MMX registers can function as vector registers. This means that each of these registers can represent one 64-bit integer value, two 32-bit integer values, four 16-bit integer values or eight 8-bit integer values. For example, the command:
psubusb mm0, mm1
is essentially equivalent to 8 byte subtractions (it stands for Packed SUBtract Unsigned Saturated Byte).
Note that in order to be backward compatible with existing OS’s (mainly Windows) Intel aliased the MMX registers to the FPU registers. This means that when accessing one of them the contents of the other one are altered as well. This allowed the OS’s to keep using their old context switching mechanisms.
SSE stands for Streaming SIMD Extensions. This was Intel’s second attempt at bringing SIMD to the PC (in response to AMD’s 3DNow!). SSE added many instructions to the instruction set as well as 16 128-bit vector registers (xmm0,…,xmm15). Unlike the 8 MMX registers, the SSE registers can contain four 32-bit floating point values. As these registers are not aliased to any existing registers (and so require special care by the OS) they are disabled by default and are only turned on when the OS explicitly commands it.
Mode 13h
The easiest to program DOS graphics mode is probably mode 13h, which we shall therefore use. In mode 13h, the screen is represented as a 320200 byte buffer (located in address 0xA000). Each byte in the buffer is an index to a 256 bytes long palette. When mode 13h is enabled, simply writing bytes memory in the range 0xA000-0x19A00 (0x19A0 = 0xA000 + 0xFA00, 0xFA00 = 320200) will draw pixels on the screen. You should not draw directly to this buffer though, as when the video card is drawing the screen, it scans through this buffer, thereby stalling your write commands. What you should do, is allocate an off-screen buffer and render to this buffer and once in a frame spill the contents of this buffer as quickly as possible to the memory block starting at 0xA000. We will get to this later.
Entering mode 13h is very easy, and is done by calling BIOS function 0×10, as such:
mov ax, 0x13
int 0x10
Calling BIOS functions is done through raising an interrupt. The parameters are passed in the registers (for more information see RBIL).
The default video mode for DOS is mode 3h. It is the mode of choice for displaying text. So upon program exit we should restore the video mode to mode 3h, as such:
mov ax, 3
int 0x10
The Palette
Now, in order to render properly colored fireworks, we need to have a decent color palette. In mode 13h the palette is set by outputting the palette index number to port 0x3c8 and then outputting 3 color values (for the red, green and blue components) to port 0x3c9. Note that if the entire palette is to be set in one go, only index 0 needs to be outputted to port 0x3c8, as it is incremented automatically after three writes to port 0x3c9. Each of the 3 color components is represented by a 7 bit value, it is a number in the range 0-63, where a value of 0 means that the component is not present at all in the color, and a value of 63 means that the component is present with full opacity in the color. So the color pure green will be represented by the tuple (0,63,0). The palette we shall use will consist of a simple linear interpolation from black to red to white. Index 0 will be total black, index 128 will be total red and index 255 will be total white.
A simple program that sets such a palette and then draws it to the screen can be found here (its source is here) Our fireworks program will use most of this code. Its output is:

The Basic Fireworks Program
Enough with the introductions – lets get to business!
The design for the fireworks program is very simple. We will manage a buffer of particles, each having the following qualities: x, y, x_speed, y_speed and color (although this version uses a constant white color for all particles, which looks better). Each particle’s position will be updated according to its speed, which will in turn be updated according to gravitation.
The full source of the program can be found here. The program itself can be found here. It begins with some defines (you can play with the number of particles by changing the NUM_PARTS define). I then allocate a buffer big enough to contain a copy of the entire screen (we will draw to this buffer, so as to avoid the stalling inherent in writing to the video memory itself). We access the buffer though the es register.
We then enter mode 13h, set the palette and zero the buffer.
We then use a little very useful trick. We call the RDTSC instruction, which reads the CPU’s 64-bit time-stamp register (this time-stamp register is zeroed upon CPU initialization – i.e. when you turn on your computer – and is incremented after every instruction! What do you say, is there a chance of overflow?) into registers EDX:EAX. As NASM does not support the RDTSC instruction I coded it as:
db 0x0f, 0x31
This trick is very useful, as when writing C++ programs for the PC, it can be used to generate very accurate time-stamps very efficiently. The following code will do the trick in Visual Studio:
int RDTSC()
{
     __asm _emit 0x0f;
     __asm _emit 0x31;
}
Lets get back to the fireworks program. We use this trick to generate a random seed for the random number generator (RNG). This RNG will later be used to initialize the particles.
Next, is the init_particle function, which as its name implies, initializes a particle’s properties. In order to make the particles look like fireworks I initialize the position of bunches of particles to the same value (using the global_x and global_y variables). The init_particle function accepts a single argument (a pointer to a particle) passed through the bp register.
The MAIN function updates the particles (and calls init_particle when needed) and then draws the particles to our off-screen buffer.
After all of the particles are drawn, the MAIN function calls two functions which apply filters on our buffer, before displaying it on the screen (by copying our video buffer to address 0xA000).
The Filters
These filters are very important (and are implemented using MMX!). There are three: mmx_shade, mmx_blur and mmx_blur_right.
The particles are drawn by the MAIN function with a solid white color (i.e. an index of 255). Instead of wiping the screen after each frame, we call the mmx_shade function which decreases the value of all the pixels on the screen by 1. Its code is very simple:
mmx_shade:
mov cx, 320*200/8
xor di, di
movq mm1, [sub_mask]
.lop:
 movq mm0, [es:di]
 psubusb mm0, mm1
 movq [es:di], mm0
 add di, 8
 loop .lop
ret
Where,
sub_mask: dd 0x01010101, 0x01010101
Note how simple this is! First of all we gain a big speed factor as we are processing 8 pixels in each iteration. Even more importantly we use the extremely convenient saturated subtraction instruction. Saturated subtraction means that if the result of the subtraction is negative, then instead of getting the value mod 256, we get 0!
Running the fireworks program with only the mmx_shade filter on, results in this:
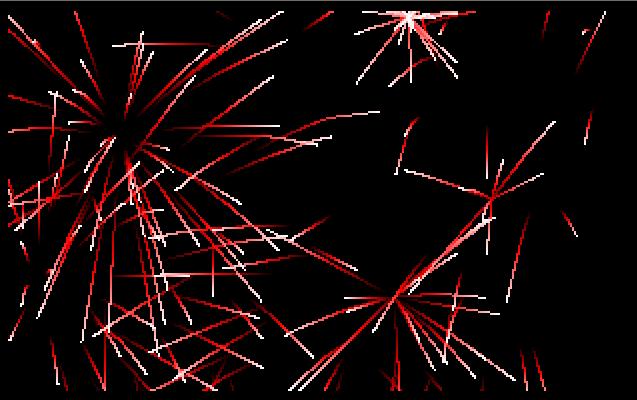
Not very impressive yet, but it does look like fireworks! (at least when animated…)
In order to make our program much nicer, we use two more blurring filters. The mmx_blur function averages the value of all pixels with that of their 4 immediate neighbours (giving twice more weight to the value already in the current pixel). Its code is:
mmx_blur:
mov cx, (320*200-330*2)/8
mov di, 328
.lop:
 movq mm0, [es:di]
 movq mm1, [es:di+1]
 movq mm2, [es:di-1]
 movq mm3, mm0
 movq mm4, [es:di-320]
 movq mm5, [es:di+320] pavgb mm0, mm1
 pavgb mm3, mm2
 pavgb mm4, mm5
 pavgb mm3, mm4
 pavgb mm0, mm3 movq [es:di], mm0
 add di, 8
 loop .lop
ret
Notice that we skip the first and last lines (plus several extra bytes) in order to keep the function as simple as possible. Those of you with sharper eyes will observe a small issue with this function. In order to properly perform these averages, we need to use a third buffer. As we are scanning through our buffer, we use the results of previous blurs as inputs to the following ones, instead of using the original contents of the buffer. This is not very noticeable, and as it saves us the need to allocate a third buffer it is worth it.
Running the program with the mmx_blur filter applied, as well as the mmx_shade filter, results in this:
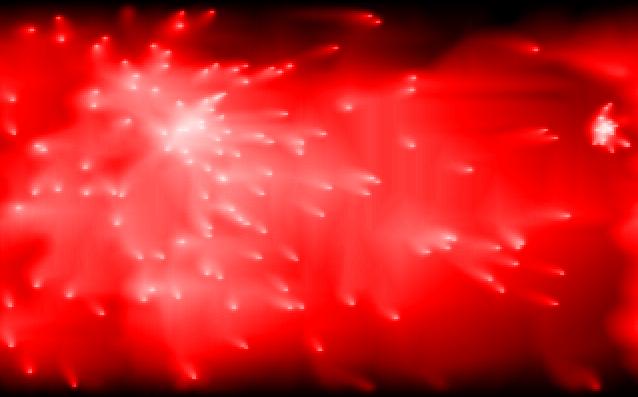
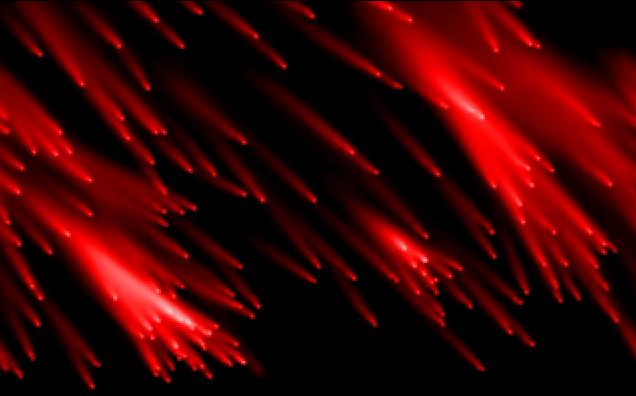
Much nicer! Finally we have the mmx_blur_right function, which is a slight variation of mmx_blur, that gives the fireworks comet like appearance. Its code is self-explanatory:
mmx_blur_right:
mov cx, (320*200-330*2)/8
mov di, 328
.lop:
 movq mm0, [es:di]
 movq mm1, [es:di+1]
 movq mm2, [es:di+320]
 movq mm3, [es:di+321]
 pavgb mm0, mm1
 pavgb mm3, mm2
 pavgb mm0, mm3
 movq [es:di], mm0
 add di, 8
 loop .lop
ret
The MAIN program switches between the two blur functions once in a while. The result of applying the mmx_blur_right function is:
Exercises to the Reader
Change the three filter functions so that they use the 16-byte SSE registers, thus gaining a factor of 2 on these functions’ running time. This is very easy! Add another offscreen buffer and correctly implement the blurring. Make the program shorter/cleaner/nicer. Play with the parameters. Change the palette. Enjoy! I hope that you now have a decent understanding of SIMD and how to use it when programming the Pentium!
PS – in case you want to assemble the source use the following command:
nasmw.exe fireworks.asm -o fireworks.com